
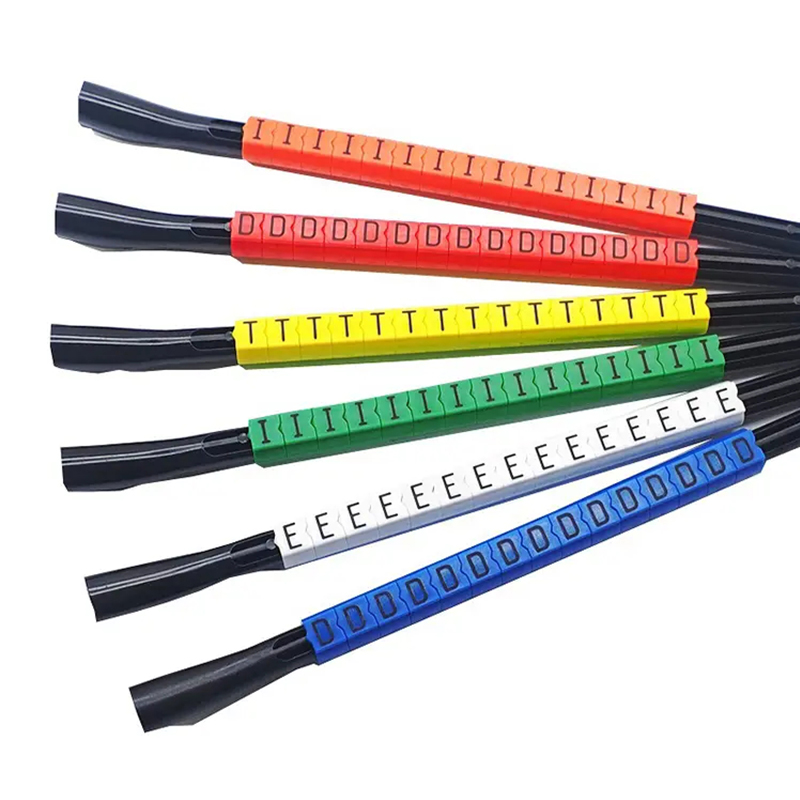
Slip on wire markers are small, expandable sleeves that slide onto a wire or cable to label it. They carry printed numbers, letters, or symbols that tell a technician exactly which wire goes where during installation, routine maintenance, or an emergency repair three years after the panel was built. Unlike adhesive tape or heatshrink labels, they don’t need a heat gun or a sticky surface that dries out over time. You push them on, they grip the insulation, and they stay legible.
Why identification matters before anything else
A control panel with fifty identical grey wires is a troubleshooting nightmare. Every minute a technician spends tracing a signal path or ringing out a cable is a minute the machine isn’t running. Slip on wire markers turn that guessing game into a quick visual check. The marker stays on the wire permanently, so the labeling investment made during assembly keeps paying back every time someone opens the enclosure.
Where these markers show up every day
●Control panel building: Panel shops label every conductor before it lands on a terminal. Markers stay put through routing, bundling, and cable tying.
●Field retrofits and repairs:A field service tech carrying a pocketful of slip on markers can relabel damaged or faded wiring without shutting down for hours or waiting for a heatshrink printer.
●Aerospace and defense harnesses: Tight spaces and high vibration demand markers that won’t unravel, peel, or outgas inside sealed avionics bays.
●Rail and mass transit:Rolling stock sees constant vibration, temperature swings, and occasional power washing. A marker that stays in place keeps the wiring schedule readable through multiple maintenance cycles.
●Industrial machinery and OEM builds:Equipment builders rely on them for traceability. A clearly marked wire set lets a technician on another continent verify connections during a video call.
Material choices that affect lifespan
The base material of a slip on wire marker determines whether it stays flexible and legible or becomes brittle and yellow after a few thermal cycles.
●PVC:The most common material. Flexible, affordable, and suitable for indoor control panels. It handles moderate temperature ranges and resists oils and mild chemicals. Not the best pick for outdoor sun exposure unless UV-stabilized.
●Polyolefin or cross-linked elastomer:Handles higher temperatures and tougher chemical exposure. Found more often in aerospace and defense applications where the marker must not shrink, crack, or emit fumes.
●Halogen-free and low-smoke grades:Required in tunnels, rail vehicles, and confined public spaces where burning insulation and markers must not produce dense toxic smoke.
A buyer skimming a product listing should check two things first: the continuous operating temperature range, and whether the material meets any relevant fire safety standard for the target industry.
The practical advantage of slip on over other methods
Heatshrink markers need a hot air tool, extra time per wire, and enough clearance around the wire to get the tool in place. Adhesive wrap labels can flag after a few years, especially in oily environments or where the wire flexes. A slip on wire marker doesn’t need heat, doesn’t unstick, and doesn’t require flat surface room. It goes on with finger pressure alone.
This matters most during field rework. A technician kneeling inside a cramped cabinet can slide a marker over the end of a wire in seconds, even if the terminal block is already populated. No need to disconnect the wire, no need to clear space for a heat gun, and no risk of scorching nearby components.
Sizing the detail that trips up first-time buyers
A marker that fits too loosely migrates along the wire or bunches up inside a bundle. One that fits too tightly splits during installation or stretches to the point where the printed text distorts. Good slip on wire markers are sized by a combination of wire outside diameter and the diameter of any terminal or connector the marker must pass over.
The standard approach is to measure the largest diameter the marker must slide past often the insulation crimp of a terminal or the body of a bootlace ferrule and choose a marker that grips the insulation snugly once it slides into place. Many suppliers offer sizing charts that reference both the wire gauge and the marker’s expanded and relaxed diameters. Ignoring those charts leads to a box of markers that sit unused on the shelf.
Printing and legibility what to expect
Slip on wire markers come either pre-printed with common characters or blank for on-demand marking. Pre-printed books or reels are fast for common panel numbering schemes. For custom text, there are two main paths: thermal transfer printing directly onto the marker sleeve, or using a companion printable insert that slides into a clear outer sleeve.
The key performance metric is print permanence. A marker that rubs off after six months of vibration against a cable tie is a liability. Quality markers resist smearing from oils, cleaning solvents, and handling during subsequent service visits. Some carry a printed legend that is actually molded into or fused with the marker body, making it effectively permanent.
Common mistakes that reduce marker effectiveness
●Skipping the marker entirely on the neutral or ground:Every wire benefits from identification, especially in complex three-phase systems where multiple circuits share the same enclosure.
●Placing the marker where it can’t be seen:A marker buried six inches inside a dense wire bundle doesn’t help anyone. Position markers close to the termination point and orient them so the legend faces outward.
●Assuming all markers handle all temperatures:A PVC marker inside an enclosure that cycles to 90°C every day will harden, crack, and eventually fall off. Match the material to the application’s thermal profile.
●Overlooking chemical exposure:Cutting oils, hydraulic fluid mist, and cleaning sprays attack some plastics. If the environment is chemically aggressive, check the material resistance chart before choosing the marker type.
How to select the right marker for a project
A few minutes spent defining the requirements prevents a bulk purchase from turning into wasted inventory. Before ordering slip on wire markers, pin down these points:
1.The diameter range of the wires being marked, including any connectors the marker must slip past.
2.The operating temperature range inside the enclosure or along the cable run, not just the ambient room temperature.
3.Any fire, smoke, or toxicity standards that apply to the finished equipment.
4.The printing method—pre-printed, thermal transfer, or insert-based and whether it aligns with existing in-house marking tools.
5.The environmental exposure—UV, oil mist, cleaning chemicals, or outdoor weather all constrain material selection.
Why a small part makes a big difference
Slip on wire markers cost very little but carry a lot of responsibility. A missing or unreadable marker turns a five-minute fix into an hour of wire tracing. One that falls off inside a sealed harness erases the only record of what was there. In panel building, rail, aerospace, and industrial machinery, downtime always costs more than the labeling. Getting the marker right at the build stage and keeping spares on hand is one of the simplest ways to make the next technician’s job straightforward instead of a puzzle.
Post time: May-12-2026